How We Built Driverless Label Printing in Our Electron App

Label printing is one of BoxHero's most-used features. The idea is simple: design a label, hit print, get a label. But users kept running into printer issues that shouldn't have been their problem. We spent months fixing that.
In this post, we'll cover the driver situation on Windows and macOS, and the two solutions we shipped: native OS print APIs, and direct USB with no driver at all.
What was broken?
BoxHero's label printing used to generate a PDF. Users would then print that PDF through their browser or system viewer, and that's where things fell apart.
1. Printer setup was manual and repetitive. Users had to change their printer settings on the first print, and change them again whenever the label size changed. This was required regardless of the paper size set in BoxHero or the size embedded in the PDF.
2. Dithering ruined barcodes. Thermal printers apply dithering by default, which blurs barcode edges just enough to make them unscannable. Users had to dig into their printer driver settings to turn it off, and redo it after every driver reinstall.
3. Unpredictable output. If the label size in the printer settings didn't match the actual label, the printer would either blow the image up to fill the page or rotate it sideways. There was no error message, just wrong output.
What we wanted
BoxHero's label designer already knows the paper size since users set it when designing their labels. We wanted to use that information to print at exactly the right dimensions, with no dithering, without the user touching printer settings at all.
This is how manufacturer tools like Zebra Designer work. Regardless of your default printer configuration, those tools print at the designed dimensions. We wanted BoxHero to feel the same way.
The catch: BoxHero is a web-based SaaS product, and web standards don't give you fine-grained control over printing. Fortunately, we ship an Electron-based desktop app, which gave us access to each OS's native APIs.
Background: How Thermal Label Printers Work
Before getting into the solutions, it helps to understand the full print pipeline:
When you print a document, the application renders it into a bitmap image and hands it off to the printer driver. The driver translates that bitmap into a command language and sends it to the printer.
In the case of PDF printing, the PDF's vector graphics are first rasterized (via a library like PDFium) before reaching the driver.
Printer Command Languages
ZPL and TSPL are text-based protocols for instructing a printer. Different manufacturers support different command sets:
| Language | Manufacturer | Notes |
|---|---|---|
| ZPL | Zebra | Market leader globally |
| TSPL | TSC | Supported by most Chinese-made printers |
| EZPL | Godex | |
| SLCS | Bixolon |
These languages natively support drawing text, lines, and barcodes. If you're targeting a specific printer model, sending commands directly (without a driver) is more efficient and precise.
But we're working with arbitrary PDFs, so we can't easily extract individual elements. Fonts would also need to be pre-installed on the printer. In the end, sending the full bitmap was the practical choice.
The Current State of Printer Drivers
Windows
The label printer market is largely Windows-centric. After buying and testing printers from more than ten brands, we found that drivers are mostly produced by just two companies, who then white-label them to the printer manufacturers:
- Loftware (formerly NiceLabel): Used by Zebra, Bixolon
- Seagull Software (makers of BarTender): Used by most other brands
The "disable dithering" or "clipart mode" option in these drivers uses a simple threshold: pixel values 0–127 become black, 128–255 become white. For barcode printing, dithering must always be off.
One frustrating detail: dithering is enabled by default after installation, so users have to go find the setting and turn it off.
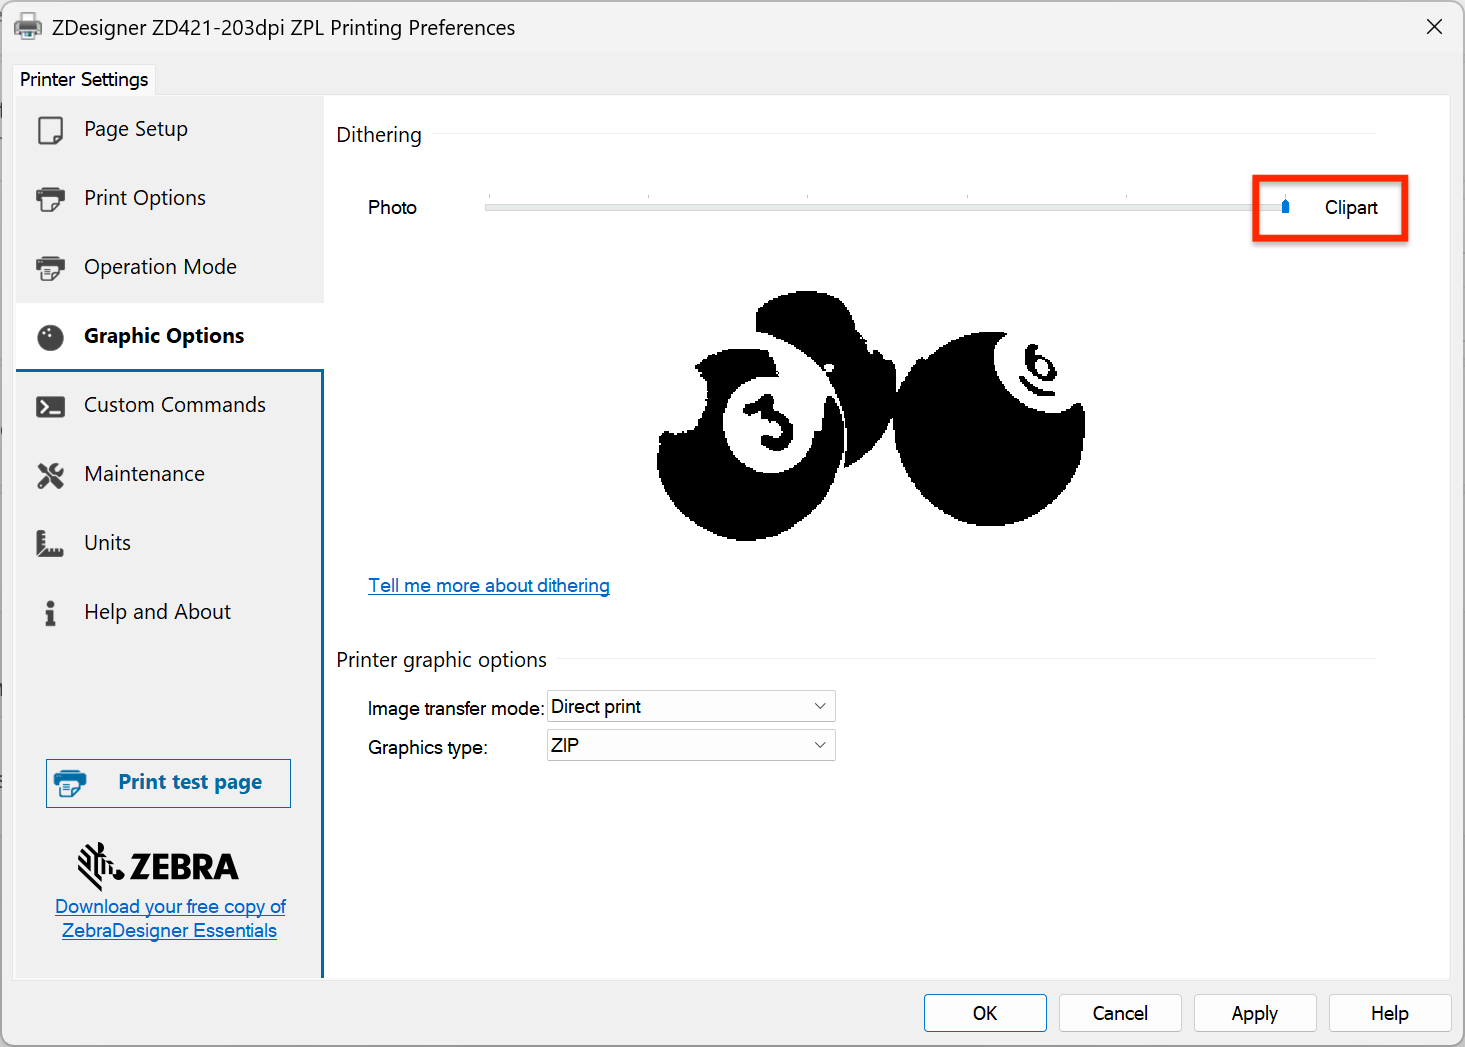
Given that thermal label printers are used almost exclusively for barcodes and text, it's hard to understand why clipart mode isn't the default. It feels like a setting optimized for the wrong use case.
macOS
Zebra, TSC, Bixolon, and others offer Mac drivers, but there's a catch.
For barcodes, crisp black-and-white output is non-negotiable. Dithering blurs the edges and makes barcodes unscannable. The result: printing barcodes on macOS with the stock driver is essentially broken.
macOS ships with a built-in ZPL driver, but it offers no dithering control either.
Some manufacturers work around this by shipping their own drivers with dithering disabled by default. Zebra, despite being the market leader, offers no way to turn dithering off on Mac. For a company whose printers are purpose-built for barcodes, that's a notable gap.
Looking at the CUPS issue tracker, this appears to be a won't-fix. The CUPS maintainer has since built a separate label-printer-focused tool called lprint, which uses IPP Everywhere and converts bitmaps to ZPL/TSPL directly. But it's CLI-only and was noticeably unstable in our testing.
There is a paid third-party driver that solves the dithering issue on macOS. We tested the watermarked free version and it worked well.
...
None of these workarounds felt acceptable as something to push onto our users. So we built two solutions: one that works through native OS print APIs, and another that skips the driver entirely and talks to the printer over raw USB.
Solution 1: Native Print API
The lowest-level print APIs on Windows and macOS are GDI and Core Graphics, respectively. Drawing directly through these APIs bypasses most of the issues we were running into.
Two things worked in our favor:
- Direct paper size control. We can specify the exact paper dimensions in the API call, independent of the printer's default settings.
- Dithering bypass. If you draw a 1-bit black-and-white image without any scaling, dithering is never applied.
The approach is simple:
→ Draw at (0, 0) with no scaling
Converting PDF to 1-bit BMP
The first step is rendering the PDF page into a bitmap. We use PDFium with all smoothing explicitly disabled:
RenderFlags: FPDF_RENDER_FLAG_PRINTING
           | FPDF_RENDER_FLAG_RENDER_NO_SMOOTHPATH
           | FPDF_RENDER_FLAG_RENDER_NO_SMOOTHIMAGE
           | FPDF_RENDER_FLAG_RENDER_NO_SMOOTHTEXT
The rendered RGBA bitmap is then converted to 1-bit black and white using a simple threshold:
// ITU-R BT.601 grayscale conversion
gray = (R * 299 + G * 587 + B * 114) / 1000;
// white or black, nothing in between
pixel = (gray >= 128) ? 1 : 0;
No Floyd-Steinberg. No ordered dithering. Just a hard cutoff at 128.
Label content (text, barcodes, QR codes) is already designed to be black-on-white, so this produces clean, sharp output every time.
Windows Implementation (GDI)
On Windows, the DEVMODE structure gives us the same level of control, plus one key field:
// Configure paper size and explicitly disable dithering
devmode.dmPaperSize   = DMPAPER_USER;
devmode.dmPaperWidth  = widthMm * 10;   // units: 0.1mm
devmode.dmPaperLength = heightMm * 10;
devmode.dmDitherType  = DMDITHER_NONE;  // important

// Render the 1-bit BMP directly
// No scaling, no color conversion
SetDIBitsToDevice(
    hDC, x, y, width, height,
    0, 0, 0, height,
    bits, &bmi, DIB_RGB_COLORS
);
DMDITHER_NONEis the most important line here. Without it, the GDI print pipeline may apply dithering even to a 1-bit image.SetDIBitsToDevicewrites the bitmap pixel-for-pixel onto the device context without stretching or interpolation.
PHYSICALOFFSETX, PHYSICALOFFSETY) representing the unprintable margin area. You need to subtract this from your drawing coordinates, or the image will be shifted and clipped at the edges.macOS Implementation (Core Graphics)
On macOS, we use the Print Manager API to create a custom paper size and draw the bitmap directly:
// Create a custom paper size to match label (mm → points)
double widthPt  = widthMm * 72.0 / 25.4;
double heightPt = heightMm * 72.0 / 25.4;
PMPaperMargins margins = {0, 0, 0, 0};
PMPaperCreateCustom(
    printer, CFSTR("custom"), CFSTR("Custom"),
    widthPt, heightPt, &margins, &paper
);

// Draw the 1-bit bitmap at (0, 0)
// No scaling
PMSessionGetCGGraphicsContext(session, &cgContext);
CGContextDrawImage(
    cgContext,
    CGRectMake(0, 0, width, height),
    image
);
The key is PMPaperCreateCustom. It tells the system exactly how big the label is, regardless of the printer's default paper size.As mentioned earlier, macOS (CUPS) doesn't expose an option to disable dithering. But it turns out that if you draw a 1-bit bitmap at its exact pixel dimensions with no scaling, the print pipeline has nothing to dither.
- Every pixel maps 1:1 to a dot, so the output comes through clean.
- The workaround isn't to disable dithering; it's to make dithering irrelevant.
It works with any printer that has a driver installed, whether it's connected over USB, WiFi, LAN, or Bluetooth. The driver handles the actual transmission; we just hand it a clean bitmap.
Solution 2: Driverless USB printing
The native API approach works well, but it has limitations: USB users still need to install a driver, and on some printer models, the bitmap gets clipped at the left and right edges.
So we also implemented direct USB communication, sending printer commands (ZPL, TSPL, EZPL, or SLCS) straight to the printer without any driver.
How it works
USB printers expose a standard interface class (bInterfaceClass = 7), which lets us discover connected label printers automatically without any driver. We open a bulk OUT pipe and write commands directly.
The same 1-bit BMP from Solution 1 gets translated into a printer command language instead of being drawn through a graphics API.
Here's what a ZPL label looks like:
^XA                        // start label
^PW812 ^LL1218             // print width and label length
^FO0,0                     // position at origin

// compressed bitmap
^GFA,{size},{size},{bytesPerRow},{data}^FS

^PQ1,0,0,Y                 // print 1 copy
^XZ                        // end label
The ^GFA command accepts the bitmap as hex data with RLE compression. ZPL's RLE scheme is simple but effective:
GthroughYencode 1–19 repeats,gthroughyencode 20–380 repeats in steps of 20, and:means "repeat the previous row."
For a typical shipping label, this compresses the data to a fraction of the raw bitmap size.
For TSPL (used by TSC and many other manufacturers) labels, the equivalent is:
SIZE 100 mm, 150 mm        // label dimensions
GAP 3 mm, 0 mm             // gap between labels
CLS                        // clear buffer

BITMAP 0,0,{bytesPerRow},{height},0,{raw binary data}

PRINT 1,1                  // print 1 copy
TSPL's BITMAP command takes raw binary data rather than hex, so there's less encoding overhead but no built-in compression.
Coverage and auto-detection
The core rendering logic is simple: draw the bitmap at (0, 0) with no scaling. We implemented all four command languages: ZPL, TSPL, EZPL, and SLCS.
The hard part was figuring out which printer speaks which language, and doing it automatically.
USB devices expose a Vendor ID and Product ID, but there's no public registry mapping those to command languages. The only way to find out is to physically plug in a printer and check. 🙃
So we did what any (reasonable) team would do: we bought every label printer we could get our hands on. We ended up with about ten printers across brands, which let us build this mapping:
| Manufacturer | Vendor ID | Command Language |
|---|---|---|
| Zebra | 0x0A5F |
ZPL |
| Honeywell | 0x0C2E |
ZPL |
| Bixolon | 0x1504 |
SLCS |
| Godex | 0x195F |
EZPL |
| TSC, Xprinter, MUNBYN, Rollo, etc. | (default) | TSPL |
*Brother, DYMO, SATO, Seiko, and Argox are not supported at this time.
DPI detection
Resolution is another variable we need to get right. 203 DPI is by far the most common among thermal printers, but 300 DPI models exist too. Drivers typically handle DPI detection automatically, but in a driverless setup there's no reliable way to query it.
Our approach: use the same Vendor ID and Product ID lookup to automatically select 300 DPI for known high-resolution models, and fall back to 203 DPI for everything else.
Here's a sample of what that mapping looks like:
| Manufacturer | Vendor ID | Product ID | Model | DPI |
|---|---|---|---|---|
| Zebra | 0x0A5F |
0x0187 |
ZD421 | 300 |
| Zebra | 0x0A5F |
0x0192 |
ZD621 | 300 |
| Zebra | 0x0A5F |
0x0130 |
ZT610 | 600 |
| Honeywell | 0x0C2E |
0xFE3D |
PC42E-T | 300 |
| MUNBYN | 0x09C6 |
0x0248 |
P941BP | 300 |
| Xprinter | 0x2D37 |
0xB374 |
XP-H500E | 300 |
It's not perfect, but it covers the majority of cases without requiring user input.
The Godex Problem.
The trickiest case is Godex — every Godex printer reports a Product ID of 0x0001, which makes model-level identification impossible.
You can technically query a printer's DPI by sending a command in its native protocol and parsing the response, but there's no command that returns DPI alone. You get a full dump of all printer settings as plain text, which needs to be parsed and interpreted.
Getting that parsing logic to work reliably across every model is its own project, so for now we're sticking with the heuristic approach.
What's Next
Most label software is heavy and complex. BoxHero already has all your item data, so printing a label is just a few clicks away. The printer setup was the last piece that still felt harder than it should.
These changes make it much easier. We think the difference will be most obvious for users who regularly switch between different label sizes.
We haven't tested every printer out there, so we're not claiming perfection. Our estimate is that this works correctly on 90%+ of printers, and we'll keep improving it based on what we hear from users.
Once USB printing is fully stable, we plan to extend support to Bluetooth, WiFi, and Ethernet connections. Most of the hard work is already done: the command language knowledge and formatting logic we built for USB carries over directly to other transports.
- Bluetooth. Bluetooth-capable label printers are still relatively uncommon, but the popular Zebra ZD421 ships with BLE built in. Connecting via BLE and sending ZPL works without any pairing ceremony.
- One thing to watch: the ZD421's optional wireless module (a separate purchase) uses Classic Bluetooth rather than BLE. Devices without MFi certification won't work with iPhone.
- WiFi and Ethernet. Network-connected printers accept commands (ZPL, TSPL, etc.) on port 9100. Once we have a target IP, it's the same thing we already built for USB: same command generation, different transport.
- Mobile. For now, we're focused on getting the desktop experience right. Once we're confident it's solid, we'd like to bring direct printing to the BoxHero mobile app as well.
If you're managing inventory and want label printing that doesn't require a manual, give BoxHero a try. Running into issues with a printer we don't support yet? Let us know.